This ride is a 13-story elevator drop ride that first opened in 1994 in Florida, and it was such an impressive engineering achievement. It’s now in four different parks, including Anaheim Disneyland.
What’s really unique about this ride is that you can experience instances of microgravity, something that scientists use when they do their research and experiments on for future spaceflights.
Gravity is something that everything, whether natural or man-made, experiences on our planet, whether its distributing water down a mountain, positioning the growing of flowers, or influencing the way living organisms do their thing.
Scientists are wondering how microgravity will affect human health, especially when we start flying people around in space. By doing experiments in microgravity environments, they can better understand its effects on the human body and also on the spaceships themselves.
Before you get on this ride at Disneyland, you’ll want to attach a small ball to a bracelet on your wrist, with about a one-foot string length attached.
If you’re sitting down, you can also put a penny on your knee and see if it’s there when you’re done with the ride. Resisting the urge to jump when you start to freefall down is always the challenge, but if you do it right, the penny should hover in midair during your freefall.
Now, let’s talk more about the ride itself.
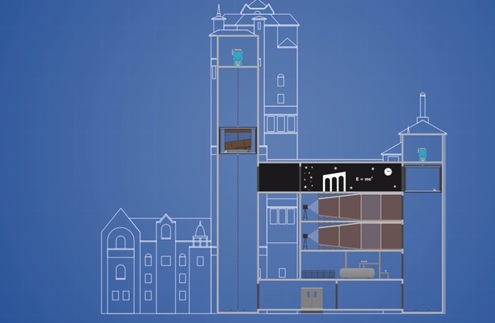
This ride is 200 feet tall and holds two separate elevator shafts 158 feet tall where the riders ride up and down during the 2 minute ride. There’s a large mechanical room above the elevator shafts that mouse the motors and mechanics.
There are also four elevator shafts located at the back of the ride that connect to the main drop shafts in the front. When you first get on the ride, you enter through one of the four back shafts, and it appears that the elevator car you’re in is the ride vehicle itself. But you’re actually getting on a vehicle that drives into the elevator shaft, like a car driving into an elevator.
The wheels lock to the elevator so the car itself doesn’t move, and then it’s transported horizontally to one of the two main elevator shafts to being the ride. They go to one of four show scenes first. The original version of this ride, Tower of Terror, used forced perspective to make the hallway scene with the ghosts appear much longer than actually it was (the walls, ceiling and floor that guests looked at all sloped inward to make the room appear longer). They also used the famous Pepper’s Ghost Illusion, which had a glass panel at a 45 degree diagonal so they could make images appear in the middle of the corridor, and it is same effect for the ballroom scene in the Haunted Mansion.
The starfield that guests saw was made of fiber optic cables behind a gauze cloth that appears opaque until it’s lit from behind, like a one-way mirror. When the set goes dark, the lights from the star field are lit up and also reflected in the glass so it appears 3D.
When the vehicle reaches the 5th floor (about halfway up the tower), the automated guided vehicles (“wire-guided” ADV’s) drive the passengers to the drop shafts similar to how a line-tracking robot follows a line drawn on the floor. There are wires on the ground that tell the vehicle where and how to go.
The radio signals from the main control room control the speed, direction and orientation of the vehicle so it takes the right path. If something goes wrong, or falls on one of the wires in the wire-guided path, or the system loses power, the vehicle is programmed to stop dead in its tracks. It’s actually one of the primary down-time causes of the ride since it is so sensitive.
The vehicle now drives the guests into an elevator in one of the two main drop shafts, locking itself to the elevator so it doesn’t move once in place within the elevator. The ride selects at random the drop sequence the guests get to experience. Each sequence includes a number of different drops and launches, with one full drop from a height of 130 feet (about 13 stories). The drop shafts actually have 17 feet above that isn’t used, and braking starts at 40 feet above the ground, so riders only get to fall for 90 feet.
The elevators in the ride is a traction elevator design by Otis Elevator Company, and is very similar to elevators that you’d find in high rise buildings. It uses two giant induction motors to accelerate riders up and down (max speed is 40 mph).
One motor sits on top of each shaft in the mechanical room, each one weighing 60 metric tons and generates 2000 hp. Each motor is connected to two cable drums in series and there’s four solenoid brakes per motor.
The elevator has a steel cables attached at the top and bottom, and also rails that connect it firmly to the sides of the shaft.
Even though a single cable is more than enough to support a fully loaded vehicle plus an automobile, two cables are used for safety.
The second drum is attached to a counterweight that weighs as much as the elevator loaded with an empty vehicle, so the motor only has to supply enough power to raise and lower the weight of just the passengers.
The cables also connect to the bottom of the elevator, so that the motors can pull the elevator down faster than it would normally go if it were freefalling. When the motor spins in one direction, the riders go up, and when the motor goes the other direction, the riders go down. It’s unique because one minute the riders are feeling weightless, and the next minute they are pushed into their seats.
One of the questions people have is “How safe is it?”
There are many safety features on this ride, but one of the most important is the solenoid braking system. There are friction pads that contact the motor shaft to bring it to a stop, much like the hand brakes on a bicycle rim.
The special deal with these brakes is that they are electrical, meaning that they release when they have an electrical signal, and tighten when there’s no signal, which means that their default position is locked on, keeping the elevator vehicle safe if anything goes wrong. In a power failure, the solenoids move the brakes to closed position, stopping the ride.
If these were to fail, there’s an emergency friction brake on the elevator rail. These clamp onto the elevator guide rails, so both the elevator vehicle and the counterweight both come to a stop (they each have their own emergency rail brakes).
If the cable were to snap and break, then there are other emergency brakes that would initiate, stopping the car. If everything failed, the car would create a cushion of pressurized air as it drops, slowing the vehicle before they hit the shock absorbers at the bottom of the shaft.
If you want your kids to make more projects like this, and if you found this helpful and you find yourself thinking, “Hey, you know, I want this person to teach my kids science for me, and to create my curriculum lessons for me…” then we can do just that.
Go to www.SuperchargedScience.com
When you get there, you’ll see a video that shows you the science curriculum that I developed and teach.
If you like what you see on that website, just fill in the form below the video and your kids can get started today doing real hands-on science with everyday materials.
Thanks for watching!
Aurora
Supercharged Science
Homeschool Science Curriculum
P.S. By the way, if you know anybody that might find this content useful or helpful, please share it! Thanks so much!!
P.P.S. You can connect with me on:
Facebook: https://facebook.com/superchargedsci
YouTube: https://www.youtube.com/user/auroram42
Podcast: https://podcast.superchargedscience.com/
Instagram: http://instagram.com/auroralipper/
Twitter: https://twitter.com/aurora_lipper