
Bonus Robot Projects!
Thanks so much for joining me for the teleclass! On this page you'll find the videos for the robots that we covered in class, plus a few extras. Enjoy!
 Click Here to Enroll in e-Camp!

Make your kids' summer great and get access to hundreds of hands-on, fun science activities!
Materials:
Please note: These items are reusable for experiments you'll be able to do after the class as well. The subject of "Robotics" requires a more expensive set of equipment than usual but we've still tried to keep everything to a minimum cost. So if you're on a tight budget, you can save money by finding old electronic toys or personal handheld fans and rip them apart to salvage wires, motors, battery cases, wheels, propellers, LEDs and more. Foam can be found in packing materials from boxes. Get creative about reusing old items in new ways!
- AA battery case (Radio Shack #270-408 or Jameco 216081)
- Two AA batteries for your battery case**
- A couple of LEDs (You can use any under 3V, but if you need recomendations, try Radio Shack part #276-026, 276-012, 276-016, or 276-311) or (Jameco 2-lead LEDs or 3-lead LEDs)
- Set of 10 alligator wires (Radio Shack #278-1157 or Jameco 10444)
- One or two 1.5-3V DC motors (Radio Shack #273-223 or Jameco 231925)
- Index card
- 6 brass fasteners
- Two large paper clips
- One foam block (2” cube or larger)
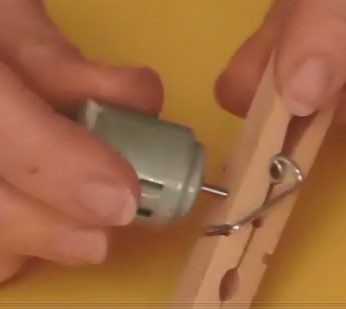
- 1 wooden clothespin *
- 10 wooden skewers
- Drill & bit the size of the motor shaft diameter
- Hot glue gun, razor and adult assistant
- OPTIONAL: Buzzer (Radio Shack #273-792 or Jameco 1956741)
*Before class, drill a hole through the jaw section your clothespin the same size as your motor shaft (refer to image). You’ll be gluing your clothespin to the motor shaft during the class.
**Note about batteries: The cheap dollar-store kind labeled “Heavy Duty” are recommended. Do not use alkaline batteries like "Duracell" or "Energizer" for your experiments with us during this class. (We'll explain during the class.)
Additional note: Jameco.com sells all these components for a fraction of the cost compared to Radio Shack, but you need to know how to look them up. If you have someone who knows their electronics components and isn't afraid of ordering, ask them to help you pick out the parts you need.
After the class, I'll be giving you access to several additional experiment videos. You'll learn more about those during the teleclass.
How to Wire Up a Basic Circuit
Cable Car
A cable car transports people or things in a vehicle that uses a strong cable to pull at a steady speed. Also called aerial lift, aerial tramway, or gondola, these are different from the cable cars associated with San Francisco, which use buried cables to move the car up steep streets.
The world's longest working cable car is in Sweden and covers 26 miles. Sweden used to operate a 60-mile cable car, but only a 8.2 miles (13.2 km) of it still works today, however this section is the longest passenger cable car in operation currently.
We're going to make a durable cable car that can travel as long as you have string for it to move along! It's really a cool and simple project, and you can add cups or berry baskets below to transport cargo. Here's what you need to do:
Materials
- 6 popsicle sticks
- AA battery case with 2 batteries
- two 3VDC motors
- tack
- scissors
- string
- hot glue gun
- glue stick for glue gun and also another one for use in the project itself (watch the video)
- two alligator clip wires (four if your motor does not have wires comes out the end but tabs instead)
Propeller Race Car
The great news is that many of the problematic airplane troubles were figured out a long time ago by two amazing people: the Wright brothers.
The Wright brothers also took an airfoil (a fancy word for “airplane wing”), turned it sideways, and rotated it around quickly to produce the first real propeller that could generate an efficient amount of thrust to fly an aircraft.
Before the Wright brothers perfected the airfoil, people had been using the same “screw” design created by Archimedes in 250 BC. This twist in the propeller was such a superior design that modern propellers are only 5% more efficient than those created a hundred years ago by the two brilliant Wright brothers.
We're going to use a propeller on our basic race car chassis (frame) to see how much thrust we'd need to make it move. If you don't want to make the fancy triangle-shaped body frame, you can substitute a foam block or two (which will make your car able to go in water, too!)
Materials
- 4 popsicle sticks
- 2 straws
- 4 wheels or lids from film canisters, or milk jug lids (anything plastic, round, and about the size of a quarter)
- 1 propeller
- 2 skewers
- 1 film can or foam block
- 3VDC motor
- AA battery case with AA batteries
- 2 alligator clip lead wires
- hot glue gun with glue sticks
Bumper Bot
If you have a pet, they'll be sure to get a great workout chasing this nifty little robot. If you can, I totally encourage you to make two or more and have a contest!
This BumperBot is one of the simplest robots you can make that uses a touch sensor, tricycle gear, and simple parts from around the house. (And there's no computer programming required.) Using a switch that reverses direction upon impact, this robot will have your kid's mind-wheels spinning. Be sure to follow the wiring directions EXACTLY as shown or it won't work right!
Okay, so - here's the deal: we're going to make a home-brew slide switch that will reverse the direction of the motor when pressed. You can add additional circuits to sound a buzzer or blink on the headlights when the motors reverse, too!
Materials
- four fat popsicle sticks
- two pennies
- 1.5-3VDC hobby motor
- two AA battery cases with AA batteries
- alligator clip wires
- 2 wooden skewers
- 2 straws
- three wheels or lids from film canisters, or milk jug lids (anything plastic, round, and about the size of a quarter)
- scissors
- hot glue gun and glue sticks
See if you can improve our design after you've built one. Here's what you do:
Jigglebot
Ever wonder how a cell phone vibrates? What mechanism could be in such a tiny space to make the entire phone jiggle around? Well, there’s a tiny motor inside with an off-center weight on the shaft, called an eccentric drive.
You can still see eccentric drive mechanisms in older steam engines where the rotational motion is converted to liner? movement. Eccentrics are also found on tandem bicycles with timing chains.
Kids can make this robot in less than five minutes, but it will take hours to get all their modifications and adjustments just right. This robot works by wobbling, and the sloppier the kids are in their construction, the better the robot dances around. Play with the placement of the weight (battery pack) and the legs. Add more skewers, adjust their position and angle until you get it dancing without toppling over.
Materials
- 10 (or more) skewers
- foam block
- 3VDC motor
- wooden clothespin
- AA battery case with AA batteries
- 2 alligator clip lead wires
- hot glue gun with glue sticks
- Optional: gear that fits onto the motor (you can alternately drill a hole in the clothespin as shown in the video)
Start building your dancing jigglebot by watching this video:
Most kids will make the legs parallel to the vertical, but quickly find that having the skewers flared out makes for a more stable design. Some jigglebots will spin in circles, others just stand and shake, and still others will zip off at a good pace in a straight line. We use a clothespin so you can add more weight (clip something inside the clothespin) if you need to.
Tip: The 'sloppier' kids build this robot, the better it moves. Enjoy!