
Laser Microscope Lesson
Build a Homemade Laser Microscope
Today you'll discover the microorganisms in pond water using a laser and a paperclip. Using basic principles of optics, you'll be able to build a homemade laser microscope that uses projection and magnification to see tiny critters swimming in your water sample.
Key Concepts
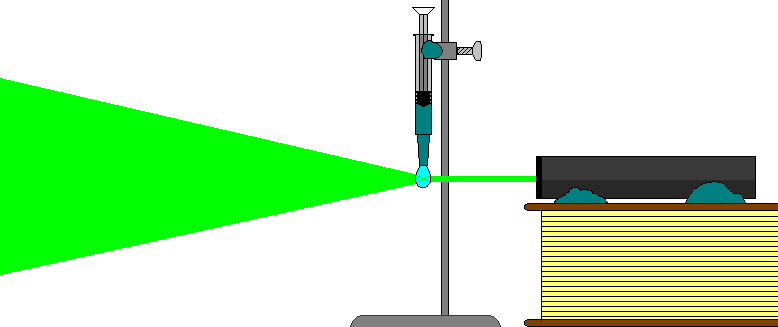
Here's how it works: by shining a laser though a drop of water, we can see the shadows of objects inside the water. It's like playing shadow puppets, only we're using a highly concentrated laser beam instead of a flashlight.
If you're wondering how a narrow laser beam spreads out to cover a wall, it has to do with the shape of the water droplet. Water has surface tension, which makes the water want to curl into a ball shape. But because water's heavy, the ball stretches a little. This makes the water a tear-drop shape, which makes it act like a convex lens, which magnifies the light and spreads it out like this:
Experiment & Video
Here's how to make your laser microscope:
Materials:
- red or green laser (watch video for laser tips)
- large paperclip
- rubber band
- stack of books
- white wall
- pond water sample (or make your own from a cup of water with dead grass that's been sitting for a week on the windowsill)
Steps
- Using pliers, bend your paper into the shape shown in the video.
- Use your rubber band to attach the paperclip into position on the laser.
- Bend the wire so that when you turn the laser on, the beam goes right through the loop at the end.
- Dip the loop (not the laser!) into your water sample.
- Turn off the lights and project your laser image onto the wall.
Questions to Ask
- Does this work with other clear liquids?
- What kind of lens occurs if you change the amount of surface tension by using soapy water instead?
- Does the temperature of the water matter? What about a piece of ice?
- Does this work with a flashlight instead of a laser?