
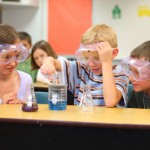
Chemistry Webinar Bonus Experiments
 Click here to get my online e-Science curriculum program at a huge discount!
Choose from grades K-8 or K-12, includes hands-on experiments in Physics, Chemistry, Earth Science, Biology, Robotics and more, with step-by-step video instructions to keep your kids totally engaged in interesting, educational activities all year long!
Bonus Experiments
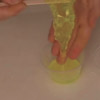 Glowing Slime
Did you know you can create two states of matter at the same time? This slime is both a solid and a liquid - leave it alone for awhile, and it'll flatten out like a pancake!
 Bouncy Ball
This is one of those 'chemistry magic show' type of experiments to wow your friends and family. You put in a clear liquid, then pull a rubber-like bouncy ball right out of the cup.
 Instant Ice
Supercooling a liquid is a really neat way of keeping the liquid a liquid below the freezing temperature. We're going to supercool water, and then disturb it to watch the crystals grow right before our eyes!
 Hot Ice Sculptures
A supercooled liquid is a liquid that you slowly and carefully bring down the temperature below the normal freezing point and still have it be a liquid. Since the temperature is now below the freezing point, the solution gives off heat as it freezes. So instead of cold ice, you have hot ice. Weird, isn't it?
 Dinosaur Toothpaste
Hydrogen peroxide is used to fuel rockets, airplanes, and other vehicle engines. Chemistry teachers everywhere use it to demonstrate the power of a catalyst. We're going to use this idea to make something that looks like it could be used as toothpaste for something big... like a dinosaur!
 Chemical Matrix
If you love the idea of mixing up chemicals and dream of having your own mad science lab one day, this one is for you. You are going to mix up each solid with each liquid in a chemical matrix.
Glowing Slime
Did you know you can create two states of matter at the same time? This slime is both a solid and a liquid - leave it alone for awhile, and it'll flatten out like a pancake!
Materials:
- water
- sodium tetraborate (AKA 'Borax')
- clear glue
- yellow highlighter
- sharp knife with adult help
- popsicle stick for stirring
- three disposable cups
- plastic zip-type bag for storing slime when you're done
Which ingredients work in making a truly slimy concoction, and why do they work? Let's take a closer look...
Imagine a plate of spaghetti. The noodles slide around and don't clump together, just like the long chains of molecules (called polymers) that make up slime. They slide around without getting tangled up. The pasta by itself (fresh from the boiling water) doesn't hold together until you put the sauce on. Slime works the same way. Long, spaghetti-like chains of molecules don't clump together until you add the sauce . until you add something to cross-link the molecule strands together.
The sodium-tetraborate-and-water mixture is the "spaghetti" (the long chain of molecules, also known as a polymer), and the "sauce" is the glue-water mixture (the cross-linking agent). You need both in order to create a slime worthy of Hollywood filmmakers.
Don't forget: You'll need a long-wave UV source (also known as a "black light") to make it glow (fluorescent lights tend to work better than incandescent bulbs or LEDs). This slime will glow faintly in sunlight, because you get long-wave UV light from the sun - it's just that you get all the other colors, too, making it hard to see the glow.
This is a sample experiment taken from the e-Science Program in Unit 8: Chemistry
Bouncy Ball
This is one of those 'chemistry magic show' type of experiments to wow your friends and family. Here's the scoop: you take a cup of clear liquid, add it to another cup of clear liquid, stir for ten seconds, and you'll see a color change, a state change from liquid to solid, and you can pull a rubber-like bouncy ball right out of the cup.
Materials:
- sodium silicate
- ethyl alcohol (check your pharmacy)
- disposable cups (at least two - and don't use your kitchen glassware, as you'll never get it clean again)
- popsicle sticks (again, use something disposable to stir with)
- Use gloves when handling sodium silicate and the bouncy balls!
Silicones are water repellent, so you'll find that food dye doesn't color your bouncy ball. You'll find silicone in greases, oils, hydraulic fluids, and electrical insulators.
The sodium silicate is a long polymer chain of alternating silicon and oxygen atoms. When ethanol (ethyl alcohol) is added, it bridges and connects the polymer chains together by cross-linking them.
Think of a rope ladder-the wooden rungs are the cross-linking agents (the ethanol) and the two ropes are the polymer chains (sodium silicate).
This is a sample experiment taken from the e-Science Program in Unit 8: Chemistry
Instant Ice
Supercooling a liquid is a really neat way of keeping the liquid a liquid below the freezing temperature. Normally, when you decrease the temperature of water below 32 deg F, it turns into ice. But if you do it gently and slowly enough, it will stay a liquid, albeit a really cold one!
In nature, you'll find supercooled water drops in freezing rain and also inside cumulus clouds. Pilots that fly through these clouds need to pay careful attention, as ice can instantly form on the instrument ports causing the instruments to fail. More dangerous is when it forms on the wings, changing the shape of the wing and causing the wing to stop producing lift. Most planes have de-icing capabilities, but the pilot still needs to turn it on.
We're going to supercool water, and then disturb it to watch the crystals grow right before our eyes! While we're only going to supercool it a couple of degrees, scientists can actually supercool water to below -43 degrees F!
Materials:
- water
- glass
- bowl
- ice
- salt
Don't mix up the idea of supercooling with "freezing point depression". Supercooling is when you keep the solution a liquid below the freezing temperature (where it normally turns into a solid) without adding anything to the solution. "Freezing point depression" is when you lay salt on the roads to melt the snow - you are lowering the freezing point by adding something, so the solution has a lower freezing point than the pure solvent.
This is a sample experiment taken from the e-Science Program in Unit 8: Chemistry
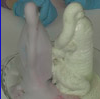
Hot Ice Sculptures
Did you know that supercooled liquids need to heat up in order to freeze into a solid? It's totally backwards, I know...but it's true! Here's the deal:
A supercooled liquid is a liquid that you slowly and carefully bring down the temperature below the normal freezing point and still have it be a liquid. We did this in our Instant Iceexperiment.
Since the temperature is now below the freezing point, if you disturb the solution, it will need to heat up in order to go back up to the freezing point in order to turn into a solid.
When this happens, the solution gives off heat as it freezes. So instead of cold ice, you have hot ice. Weird, isn't it?
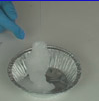
Sodium acetate is a colorless salt used making rubber, dying clothing, and neutralizing sulfuric acid (the acid found in car batteries) spills. It's also commonly available in heating packs, since the liquid-solid process is completely reversible - you can melt the solid back into a liquid and do this experiment over and over again!
The crystals melt at 136 deg F (58 deg C), so you can pop this in a saucepan of boiling water (wrap it in a towel first so you don't melt the bag) for about 10 minutes to liquefy the crystals.
Materials:
- instant reusable hand warmer (contains sodium acetate )
- gloves
- scissors
- disposable aluminum pie plate
You have seen this stuff before - when you combined baking soda and vinegar in a cup, the white stuff at the bottom of the cup left over from the reaction is sodium acetate. (No white stuff? Then it's mixed in solution with the water. If you heat the solution and boil off all the water, you'll find white crystals in the bottom of your pan.) The bubbles released from the baking soda-vinegar reaction are carbon dioxide.
This is a sample experiment taken from the e-Science Program in Unit 8: Chemistry
Dinosaur Toothpaste
Hydrogen peroxide is used to fuel rockets, airplanes, and other vehicle engines. Chemistry teachers everywhere use it to demonstrate the power of a catalyst.
To speed up a reaction without altering the chemistry of the reaction involves adding a catalyst. A catalyst changes the rate of reaction but doesn't get involved in the overall chemical changes.
For example, leaving a bottle of hydrogen peroxide outside in the sunlight will cause the hydrogen peroxide to decompose. However, this process takes a long time, and if you don't want to wait, you can simply toss in a lump of charcoal to speed things along.
The carbon is a catalyst in the reaction, and the overall effect is that instead of taking two months to generate a balloon full of oxygen, it now only takes five minutes. The amount of charcoal you have at the end of the reaction is exactly the same as before it started.
A catalyst can also slow down a reaction. A catalytic promoter increases the activity, and a catalytic poison (also known as a negative catalyst, or inhibitor) decreases the activity of a reaction. Catalysts offer a different way for the reactants to become products, and sometimes this means the catalyst reacts during the chemical reaction to form intermediates. Since the catalyst is completely regenerated before the reaction is finished, it's considered 'not used' in the overall reaction.
In this experiment, you'll see that there's a lot of oxygen hiding inside the peroxide - enough to really make things interesting and move around! You'll also find out what happens to soap when you bubble oxygen through it. Are you ready?
Materials:
- hydrogen peroxide
- yeast (the kind you'd use for baking bread)
- liquid soap
- shallow dish
- water or soda bottle
Chemical Matrix
About this experiment: Your solutions will turn red, orange, yellow, green, blue, purple, hot, cold, bubbling, foaming, rock hard, oozy, and slimy, and they’ll crystallize and gel — depending on what you put in and how much!
This is the one set of chemicals that you can mix together without worrying about any lethal gases. I do recommend doing this OUTSIDE, as the alcohol and peroxide vapors can irritate you. Always have goggles on and gloves on your hands, and a hose handy in case of spills. Although these chemicals are not harmful to your skin, they can cause your skin to dry out and itch. Wear gloves (latex or similar) and eye protection (safety goggles), and if you’re not sure about an experiment or chemical, just don’t do it. (Skip the peroxide and cold pack if you have small kids.)
Materials:
• sodium tetraborate (borax, laundry aisle)
• sodium bicarbonate (baking soda, baking aisle)
• sodium carbonate (washing soda, laundry aisle)
• calcium chloride (AKA “DriEz” or “Ice Melt”)
• citric acid (spice section, used for preserving and pickling)
• ammonium nitrate (single-use disposable cold pack)
• isopropyl rubbing alcohol
• hydrogen peroxide
• acetic acid (distilled white vinegar)
• water
• liquid dish soap (add to water)
• muffin tin or disposable cups
• popsicle sticks for stirring and mixing
• tablecloths (one for the table, another for the floor)
• head of red cabbage (indicator)
Click here to get my online e-Science curriculum program at a huge discount!
Choose from grades K-8 or K-12, includes hands-on experiments in Physics, Chemistry, Earth Science, Biology, Robotics and more, with step-by-step video instructions to keep your kids totally engaged in interesting, educational activities all year long!